
Beacon Hill: Porch final trimming

I’ve come to the point where I’m putting the finishing touches on the Beacon Hill. First, on my own, I’m adding some horizontal and vertical boards (not part of the kit) to trim the raw edges and gaps between walls. I think it makes everything look more polished.

Back to the kit. The instructions have you start at the top of the house with all the trim and brackets, but I wanted to see the porch finished, so I worked from bottom up.

First, the post brackets, which go at the top of each porch post. They are in three pieces–you sandwich the large piece between two smaller and thinner pieces.

Like so.

I decided to glue, then paint, but you can do it the other way around. There are so many tiny pieces in this step that spray paint might be the best way to go. (I don’t like spray paint because of the fumes but I can imagine it would save time!)

I glued these on upside down the first time, but they go this way, with the curved end up, like a bird with its head up.

Next are the 50 million brackets that go between the porch posts. These again are sandwiched, two smalls around a large.

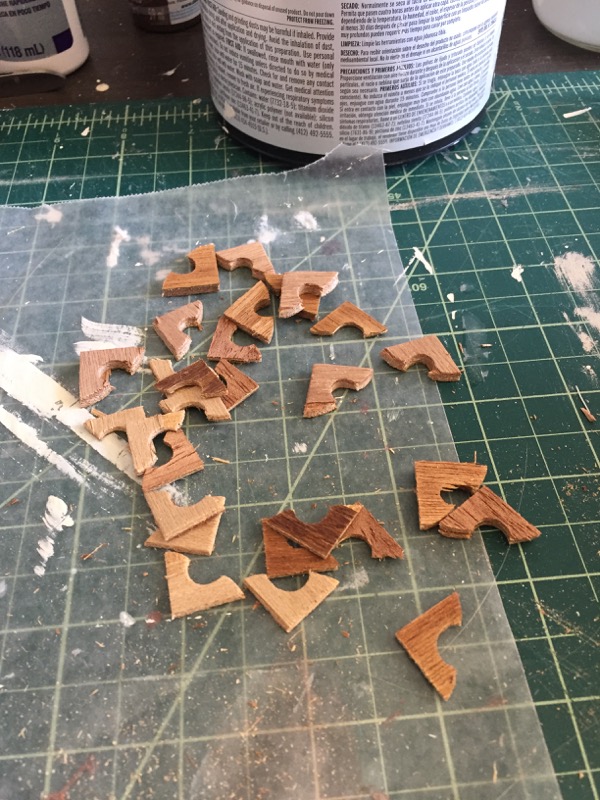
They need lots of sanding.


Two brackets go between each post with three on the right end. There are no measurements for centering them exactly, so eyeball it or measure and calculate.

The porch is finished with the long curved pieces between the posts.

The pieces are found in the middle of sheet 9 (where you punch out the large left side wall), so don’t lose track of it when you are putting the main pieces of the house together.

The pieces are in three sizes: one long one (seen at bottom), which goes on the side of the porch.

The small one (at the top in the photo) goes between the posts in front of the front door.

The medium sized ones go on the center and right front of the porch.

These are a pain to glue in (mine kept falling off) so tape helps until the glue is dry. Give it a day.

There we go–the porch trim done.

Staying on the ground floor, we have the bay roof brackets. They’re on sheet 23, the one that fell apart on me. Amazingly, I have not lost one piece (so far …)

These brackets are single thickness.

They go under the overhang on the kitchen bay (more will go on the bay windows on the other side of the house when I build it). For now, you need 10 for the kitchen bay window.

Eight go across the top of the window. Mine are spaces about 1.25 inches apart.  There’s supposed to be one facing the porch and one facing rear, but I couldn’t get them to fit right, so I eliminated them.


Filed under: Beacon Hill Dollhouse, Dollhouse kits, Greenleaf dollhouse kits, Kit Bashing, Kits Building, One-Inch scale

Comments

Popular posts from this blog

Mind the gap: Fit IKEA MALM over a tall baseboard

I forgot one thing when I ordered the MALM dresser : The baseboards in my apartment are very tall and very wide. So, when I installed it, I had a 4 cm gap between the wall and the back of the cabinet which was not aesthetically possible for me. As it is not possible to cut the back of dresser at the bottom to leave room for the tall baseboard, I decided that MALM should be raised. And it was much simpler than I had imagined. You’ll need: A MALM dresser (mine is a 6-drawer chest) Six oak bed legs (I think five would have been enough, but while I was there …) 6 mounting plates A piece of plywood the size of the bottom of the cabinet (I went to the hardware store next door, it cost me less than 5€) Screws White adhesive edging tape How to raise the MALM dresser above a tall baseboard Place the MALM upside down. Fix the plywood onto the underside of the MALM with screws. Predrill holes for the leg screws (if you have the same baseboard problem as me, make sure you measur...

IKEA KALLAX Queen Storage Bed

I built this prior to knowing this website existed, this probably would have saved some contemplation. For difficulty reference, I am no carpenter (electrician actually) and I built it with my right hand in a cast. We bought an old house with original hardwood flooring from the 40s so we were very concerned about damaging it. The casters on a normal bed frame put a lot of pressure on a small surface and we didn’t want it dented or damaged if things started a rockin …. Plus, a 40′s house has virtually no storage as you only needed 3 pairs of pants back then. IKEA material : 3 x KALLAX shelf units (4) 4 x KALLAX drawer kits 8 x KALLAX fabric boxes Non-IKEA material : 4 x 2×4 A grade (saves time) 2 x 2×6 2 x sheets 1/2″ plywood (what ever grade you want) 25ft x iron-on edge trim 100 x 3″ #8 wood screws 20 x 1-1/4″ #8 wood screws satin white paint Tools (I used) : Tape measure Drill w/ 1/8″ bit for piloting holes Impact driver for screws Table saw Miter saw Ass...

5 Creative Ways to Get Bold Colors into Your Space

Bold colors make a delightful addition to just about any space. They add an eye-grabbing element that just pulls you in. They also work well in a variety of styles, from the children’s room to artistic or boho spaces for adults. An accent color in a single piece can also work well in modern and minimalist spaces to provide a subtle pop of color. Take a look below for some creative ways to work bold color into your home. These ideas vary depending on how much effort you’re willing to put in, from retiling a bathroom to placing a few colorful furniture pieces around the room. Collect this idea These jelly chairs add instant color. Image: St Margarets Renovation and Kitchen Extension Wild jelly chairs The jelly chairs in the photo above offer a neat idea. Their see-through quality casts bright hues on the space behind them. Going for different shades in each chair gives a fun, artistic look. Combining brightly colored chairs with other colorful aspects in the room also gives a ...