
A Simple Silhouette DIY

One of my favorite things to do when trying to personalize a space is crafting something myself, or maybe a little DIY project with my husband. As many of you know I’ve been working on our back sunroom for an upcoming collaboration (I’m so excited to share it all the details soon!) the last couple of weeks. I knew I wanted to include a couple of simple projects in the space. So today I’m sharing one of those projects with you.

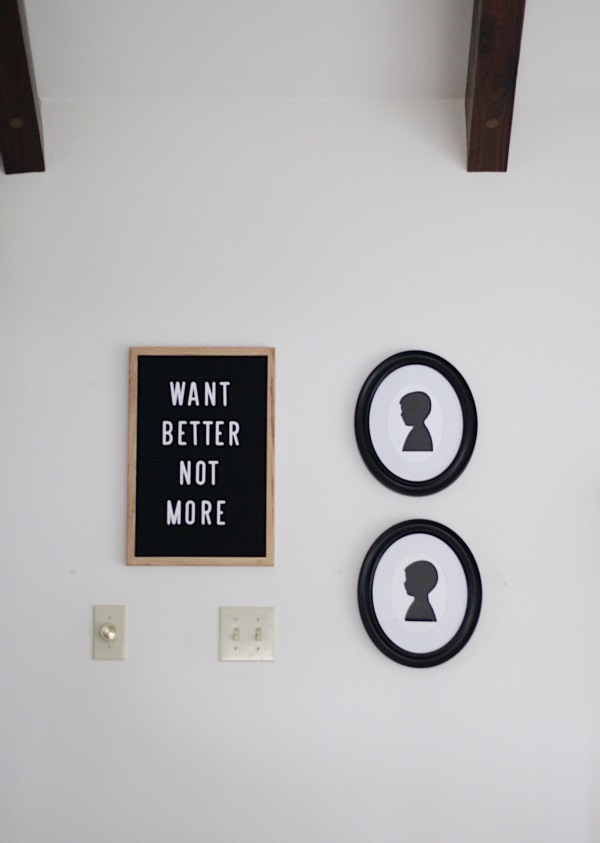
DIY Silhouette Portrait

Processed with VSCO with a6 preset


This project is fairly simple, here is what you’ll need

  • A camera, your phone should work just fine
  • white and black card stock
  • oval frame – I bought mine here
  • very sharp scissors or a xacto knife
  • a printer
  • a pencil

First you will have your child stand up against a white wall. I had my boys sit in a chair. and then I placed a small toy on the table for them to look at.

Take their picture and then upload it onto your computer. Once it’s uploaded I had to play around with mine a bit until I got the sizing correct for my picture frame. I printed it on plain white printer paper in black and white. Then cut around the picture with my scissors. Take your time especially around the nose and mouth. Once I had my “stencil” cut out I placed it on my black card stock. You’ll want to place it opposite how you’re going to frame it. That way the pencil lines will be on the other side.

Trace your picture and then again, cut it out slowly. I used very sharp scissors. Once your silhouette is cut out you’ll want to place it in your frame with your white card stock behind it. I stuck a little piece of tape on mine to hold the silhouette on the white card stock.

Processed with VSCO with a6 preset


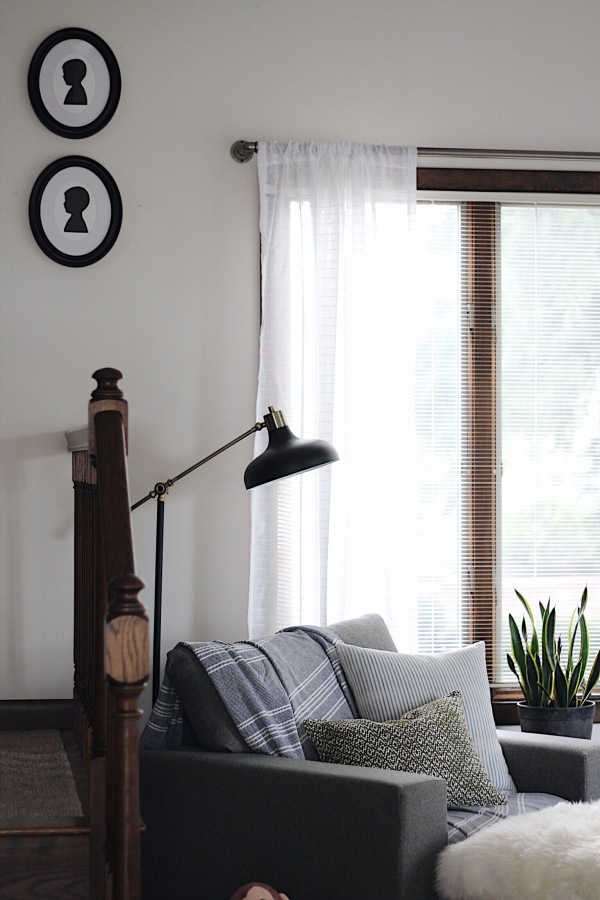
I’m really happy with how they turned out. I’ve seen some beautiful ones made by small businesses that are much more precise and intricate than mine and maybe someday I’ll replace these with one of those. But for now I really love these little handmade ones and the simple touch they add to our family room. Happy crafting friends!

If you decide to craft some yourself I’d love to see the finished project! You can tag me on Instagram here 

Blessings,

Bree ❤


Comments

Popular posts from this blog

Mind the gap: Fit IKEA MALM over a tall baseboard

I forgot one thing when I ordered the MALM dresser : The baseboards in my apartment are very tall and very wide. So, when I installed it, I had a 4 cm gap between the wall and the back of the cabinet which was not aesthetically possible for me. As it is not possible to cut the back of dresser at the bottom to leave room for the tall baseboard, I decided that MALM should be raised. And it was much simpler than I had imagined. You’ll need: A MALM dresser (mine is a 6-drawer chest) Six oak bed legs (I think five would have been enough, but while I was there …) 6 mounting plates A piece of plywood the size of the bottom of the cabinet (I went to the hardware store next door, it cost me less than 5€) Screws White adhesive edging tape How to raise the MALM dresser above a tall baseboard Place the MALM upside down. Fix the plywood onto the underside of the MALM with screws. Predrill holes for the leg screws (if you have the same baseboard problem as me, make sure you measur...

IKEA KALLAX Queen Storage Bed

I built this prior to knowing this website existed, this probably would have saved some contemplation. For difficulty reference, I am no carpenter (electrician actually) and I built it with my right hand in a cast. We bought an old house with original hardwood flooring from the 40s so we were very concerned about damaging it. The casters on a normal bed frame put a lot of pressure on a small surface and we didn’t want it dented or damaged if things started a rockin …. Plus, a 40′s house has virtually no storage as you only needed 3 pairs of pants back then. IKEA material : 3 x KALLAX shelf units (4) 4 x KALLAX drawer kits 8 x KALLAX fabric boxes Non-IKEA material : 4 x 2×4 A grade (saves time) 2 x 2×6 2 x sheets 1/2″ plywood (what ever grade you want) 25ft x iron-on edge trim 100 x 3″ #8 wood screws 20 x 1-1/4″ #8 wood screws satin white paint Tools (I used) : Tape measure Drill w/ 1/8″ bit for piloting holes Impact driver for screws Table saw Miter saw Ass...

How to Document the Home Building Process

Building your home is a unique experience filled with stories you will never forget. There is also important information you need to remember if you build, even after you settle in. Whether it’s for your family or for future renovations, documenting your build is an important part of the process. Keeping track of your documents and making sure your family stay in the loop can help you stay organized and make sure you remember everything about your build. Not sure how to stay on top of all of the details? Document the process with these simple tips so you can always look back on it fondly. Collect this idea Use social media and involve your friends. Image: Kroiss Development Keep friends and family in the loop The home building process is exciting and your friends and family will want to be included. In fact, you’ll probably find that your new home becomes a popular conversation topic. You don’t need to personally keep everyone in the loop. Instead, you can find ways to keep ev...