
How to hack a store-like vinyl record storage cabinet

I collect vinyl records and I use the IKEA KALLAX as a vinyl record storage cabinet. They are inexpensive, look and work great but they have a limitation.

I like the way record stores display their records on top, covers facing forward, so you can quickly flip through the records and find what you are looking for.

So:

I decided I would try to make my own …

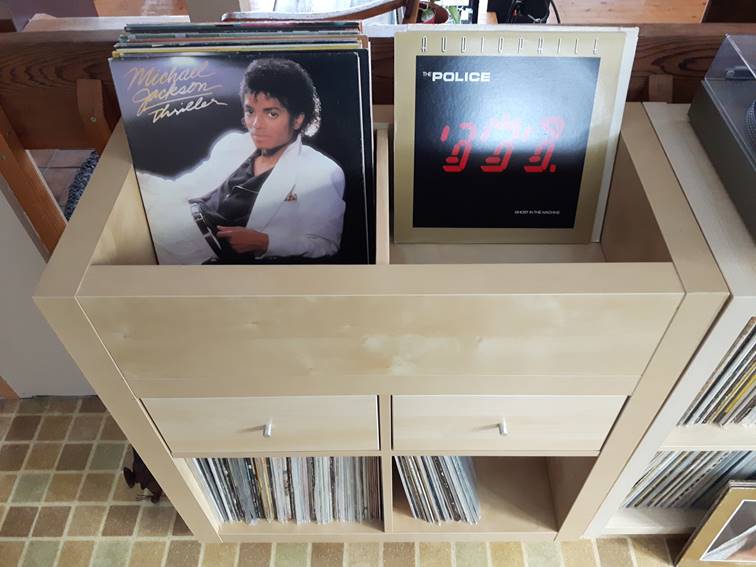
… it takes a bit of time but I think it worked out pretty well.

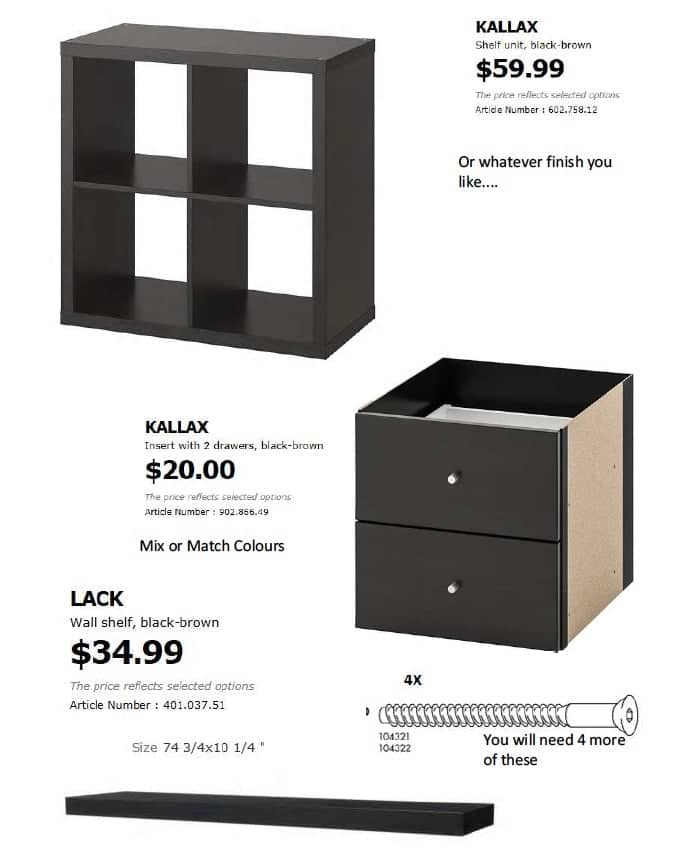
You will need a 2×2 KALLAX storage shelf and a KALLAX drawer kit. You will also need some extra parts for the front and back of the upper storage bin.

Most IKEAs have an “as is” area. I scored some extra pieces there. If not, look at the LACK shelving, which comes in similar colours. IKEA also has extra hardware in bins near the Customer Service area. Score some extra screws as well.

The tough part of this hack is making accurate cuts. So you should have some reasonable shop skills and access to a table or chop saw and a drill.

Now:

Let’s move on to the vinyl record storage cabinet, IKEA hack edition.

IKEA items:
  • KALLAX 2×2 shelf
  • KALLAX Drawer Insert
  • LACK Shelving

materials for DIY front facing vinyl record storage cabinet ikea hack

Tools:

How to hack a front-facing IKEA vinyl record storage cabinet

Step 1. Partially Assemble KALLAX Shelf

Start by assembling 2 Sides and Bottom along with long horizontal divider and short vertical divider.

DIY front facing vinyl record storage cabinet ikea hack

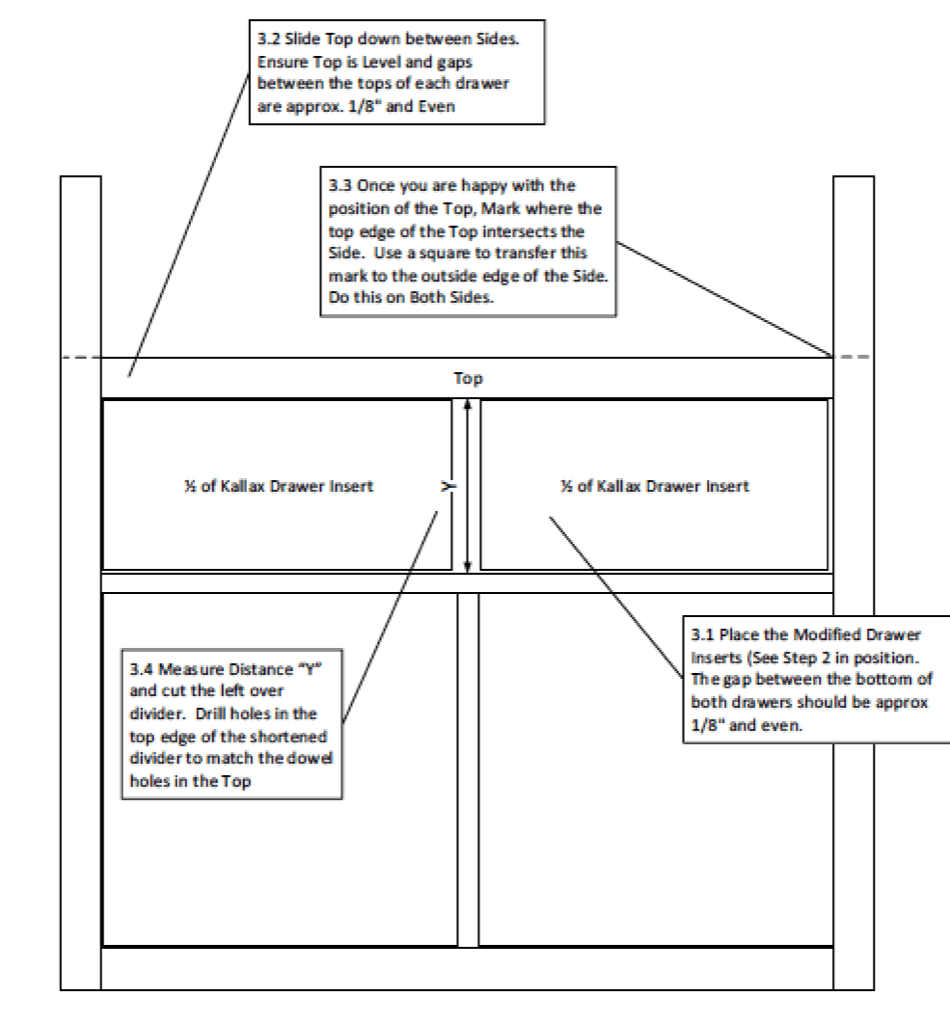
Step 2. Modification of the Drawer Insert

The KALLAX drawer insert must be cut in half as accurately as possible to provide 2 identical drawer inserts. An inaccurate job will cause assembly issues later.

Use a tape measure, a carpenter’s square or good straight edge and sharp box cutter. Measure twice, cut once.

front facing vinyl record storage cabinet ikea hack

Step 3. Temporarily Install the Modified Drawers and the Top

front facing vinyl record storage cabinet ikea hack

3.5 After completing all steps, disassemble the shelf.

Step 4. Drill 2 New Holes in Each Side Panel

front facing vinyl record storage cabinet ikea hack

Step 5. Final Assembly

5.1 Re-Assemble and install the drawers. Check for alignment and adjust as needed. Use the short screws provided with the Drawer Kit to fasten the inserts in place.

And you’re done!

front facing vinyl record storage cabinet ikea hackfront facing vinyl record storage cabinet ikea hack

Download the printable vinyl record storage cabinet instructions PDF here.

Comments

Popular posts from this blog

Mind the gap: Fit IKEA MALM over a tall baseboard

I forgot one thing when I ordered the MALM dresser : The baseboards in my apartment are very tall and very wide. So, when I installed it, I had a 4 cm gap between the wall and the back of the cabinet which was not aesthetically possible for me. As it is not possible to cut the back of dresser at the bottom to leave room for the tall baseboard, I decided that MALM should be raised. And it was much simpler than I had imagined. You’ll need: A MALM dresser (mine is a 6-drawer chest) Six oak bed legs (I think five would have been enough, but while I was there …) 6 mounting plates A piece of plywood the size of the bottom of the cabinet (I went to the hardware store next door, it cost me less than 5€) Screws White adhesive edging tape How to raise the MALM dresser above a tall baseboard Place the MALM upside down. Fix the plywood onto the underside of the MALM with screws. Predrill holes for the leg screws (if you have the same baseboard problem as me, make sure you measur...

How to Document the Home Building Process

Building your home is a unique experience filled with stories you will never forget. There is also important information you need to remember if you build, even after you settle in. Whether it’s for your family or for future renovations, documenting your build is an important part of the process. Keeping track of your documents and making sure your family stay in the loop can help you stay organized and make sure you remember everything about your build. Not sure how to stay on top of all of the details? Document the process with these simple tips so you can always look back on it fondly. Collect this idea Use social media and involve your friends. Image: Kroiss Development Keep friends and family in the loop The home building process is exciting and your friends and family will want to be included. In fact, you’ll probably find that your new home becomes a popular conversation topic. You don’t need to personally keep everyone in the loop. Instead, you can find ways to keep ev...

Brighten up: A reading lamp the book lover will love

We already had a MAGNARP table lamp in the living room, but we were missing a reading lamp next to our couch. For a standing MAGNARP floor lamp, we didn’t have space. And the available other IKEA lamps were not for our taste. I already saw solutions with FRÄCK , so I decided to make my own wall mounted reading light, fused with MAGNARP. Here goes: IKEA items used: Steps for an IKEA wall mounted reading light: 1. Take apart both sets. 2. Cut the power line of the MAGNARP to be able to pull it out from the pipe. (Cut at both ends of the switch) 3. Cut the pipe. Besides the threaded part which goes inside the bulb socket you I will need approximate 5mm. 4. Cut M10 thread on the pipe’s end, and drill over the thread inside the main plate with M10 as well. 5. Bend the mirror’s fork as seen on the picture. 6. Mark the holes from the bent fork onto the main plate, and drill holes. 7. Make the electric work with a new switch. (I laced it inside the arm before doing so...