I built this prior to knowing this website existed, this probably would have saved some contemplation. For difficulty reference, I am no carpenter (electrician actually) and I built it with my right hand in a cast.
We bought an old house with original hardwood flooring from the 40s so we were very concerned about damaging it. The casters on a normal bed frame put a lot of pressure on a small surface and we didn’t want it dented or damaged if things started a rockin …. Plus, a 40′s house has virtually no storage as you only needed 3 pairs of pants back then.
IKEA material :
- 3 x KALLAX shelf units (4)
- 4 x KALLAX drawer kits
- 8 x KALLAX fabric boxes
Non-IKEA material :
- 4 x 2×4 A grade (saves time)
- 2 x 2×6
- 2 x sheets 1/2″ plywood (what ever grade you want)
- 25ft x iron-on edge trim
- 100 x 3″ #8 wood screws
- 20 x 1-1/4″ #8 wood screws
- satin white paint
Tools (I used) :
- Tape measure
- Drill w/ 1/8″ bit for piloting holes
- Impact driver for screws
- Table saw
- Miter saw
Assembling the queen sized KALLAX storage bed
I had the luxury of building in my garage first as I am a firm believer that my first cut will always be wrong.
The bed will comprise of 3×4 unit shelf kits. The shelf is just a touch smaller than a queen mattress so it works near perfect. As a side note, all measurements were done to the outside edges of the KALLAX as the end pieces are slightly larger than the inners. I banked on the plywood sagging that gentle 3/16″ and not noticing it.
I build the inner ‘wall’ out of 2×6 to take pressure out of the floor and all more distribution surface area for the plywood. The vertical supports were just left over lumber and I centered them on the shelf ‘dividers’ so there is the opportunity of sliding long objects through the bed. I left this roughly 1/8″ longer than the length of the KALLAX shelf just so there would be some wiggle room for putting it all back together if we move it.
The rear side is T’d into the center support and is again sanded and painted to match the white. This one is load bearing (sort of), so I added a few vertical supports.

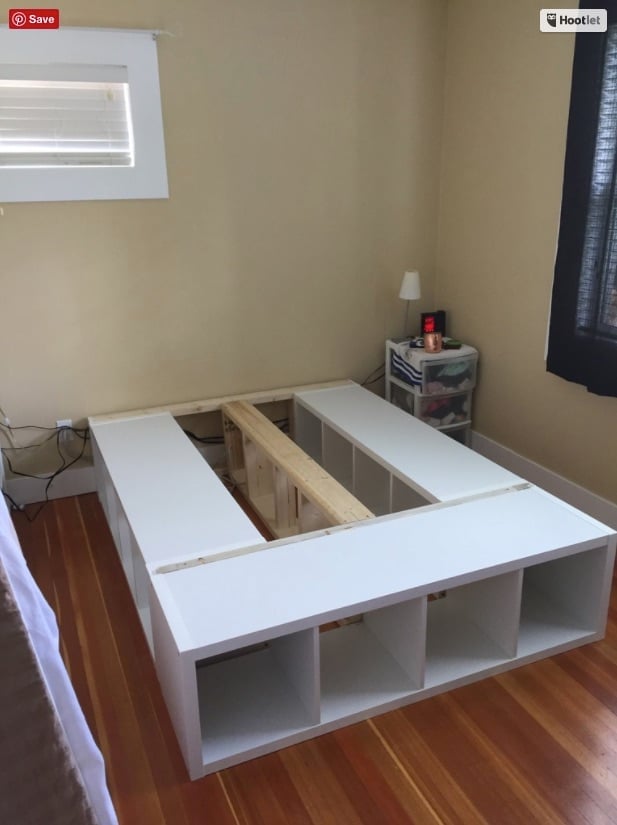
Back and center frame

First side positioned
With a 2×4 on edge behind the front shelf and a 2×4 on flat behind the bed, the dimensions were perfect, not planing needed to trim them down. I built a ‘spacer’ frame to go behind the front shelf. Solid 2×4 vertical as to be a clean line from the outside with a 2×4 on edge (sideways) along the top. This piece isn’t load bearing so I wasn’t concerned with strength, just to keep it square as its visible. Sand and paint the outside edges of the vertical 2x4s so they blend better with the KALLAX white. I screwed the frame into the shelf in just 2 places, the weight will hold it all together but I just needed to keep things square. Be sure the screws don’t penetrate all the way through or you will regret it.

Front support added
The front shelf is slid into place and gently screwed to the frame work in the middle upper section. Always to the thickest part of the shelf. Be conscious as to the positioning of the pre-drilled IKEA holes as they may affect your orientation of drawers.
Front shelf installed
Plywood top. I cut to extend 1/2″ larger than the KALLAX + wood as the mattress needed support on the ends. It is smaller than the mattress so you won’t rip your leg off on the edges. I rounded the corners to the radius of a roll of tape that was nearby and it turned out perfect. Just slightly extending passed the corners of the KALLAX so there isn’t anything sharp.

Radius cut corners with jig saw
I ironed on white edge trim to the plywood for visual prior to screwing the plywood down. I only put screws into only the frame work, not to the shelf.
I was going to wrap it in fabric as a secondary means of friction so it wouldn’t slide

Marked my center line all the way down so I could easily keep it straight.
Installed the IKEA drawer kits in the front and put the pull out boxes on the side. Laid the mattress and made the bed. Voilà.

Complete!
Next step … floating shelves for end tables and get rid of the college dorm plastic.
Great find from source: IKEA Hackers
Comments
Post a Comment