
9 Ingenious IKEA Hacks to Maximise Shoe Storage

As much as we love to have a variety of shoes to choose from, storing all of them can be a mighty big challenge — especially if yours aren’t the only feet in the home.

You want shoe storage that’s easy to access and a breeze to clean, but you also want it to look nice and blend seamlessly with your aesthetic. Fortunately, our beloved IKEA has plenty to offer in the way of hacks that’ll maximise your shoe storage stylishly and effectively.

Check out our favorite IKEA shoe storage hacks below.

#1 Tjusig Welly Rack

This hack is perfect for shoes like wellies, snow boots, and other kicks that have a tendency to track a ton of dirt through the house. It’s a breeze to execute and will provide an ultra-tidy place for your shoes to air out and dry off.

#2 Wall Mounted Shoe Organizer

wall-mounted-kitchen-rail-shoe-organizer

This wall mounted shoe organizer system shows how to keep shoes on the wall and off the floor, saving you tons of floor space. Besides, lining them up on the wall makes it so easy to pick the right pair to go with your outfit. Rails for heels and boxes for flats.

#3 Faktum Entryway Storage

kitchen cabinet to shoe storage

Sometimes the best ideas are right in front of us, it’s just a matter of looking at things from another perspective. Here, the FAKTUM cabinet is flipped on its side and transformed into abundant custom shoe storage. You could also achieve the same with the SEKTION or METOD kitchen cabinets.

#4 TV Stand into Storage Bench

ikea-hack-shoe-storage-bench

This idea is as stylish as it is effective, and it will work with a number of different IKEA television stands. It takes a bit of time to achieve, but once you’re done you’ll wonder how you ever lived without it.

#5 Albert and Gorm Wardrobe and Shoe Storage

coat-and-shoe-rack-ikea-gorm

Rather than separate your shoes from your clothes, keep your space as neat as can be by combining the two with this wardrobe and shoe storage hack. It’ll instantly declutter any space it’s a part of.

#6 Expedit/ Kallax Shoe Display

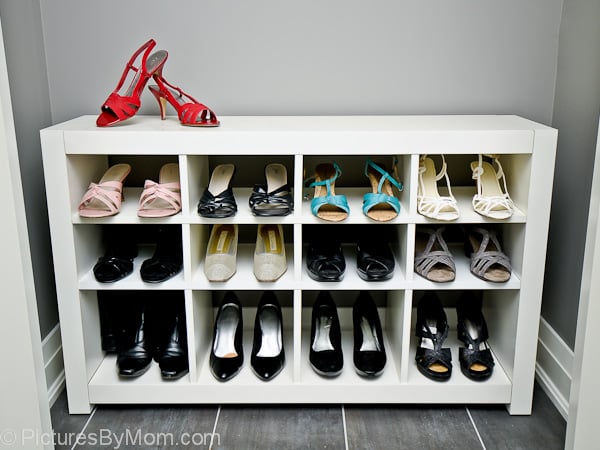
If you love to look at your shoes even more than you like to wear them, then this is the hack for you. It’ll store your shoes while displaying them beautifully, making it perfect for the stylish shoe enthusiast.

#7 Billy Bedside Table and Shoe Storage

bedside-shoe-rack

Not only will this idea maximise the shoe storage you’re working with, but it’ll provide you with extra surface area, too. Add it to your bedside for a perfect 2-in-1 shoe storage solution.

#8 Twinned Hemnes Shoe Cabinet

Twinned HEMNES shoe cabinet

Love the look of the ever-popular Hemnes shoe cabinet but don’t think it has the capacity to store all of your shoes? Then double it up with this hack to make the most of your space.

#9 Rationell Variera Shoe Organizer

Wall mounted shoe organiser tree

This organizer will display your favorite shoes so perfectly that no one will guess it was made for potholders. Plus, there’s no hammering, gluing, or sanding involved.

Want more ingenious IKEA shoe storage hacks?

Browse our shoe storage category for plenty more!

Comments

Popular posts from this blog

Mind the gap: Fit IKEA MALM over a tall baseboard

I forgot one thing when I ordered the MALM dresser : The baseboards in my apartment are very tall and very wide. So, when I installed it, I had a 4 cm gap between the wall and the back of the cabinet which was not aesthetically possible for me. As it is not possible to cut the back of dresser at the bottom to leave room for the tall baseboard, I decided that MALM should be raised. And it was much simpler than I had imagined. You’ll need: A MALM dresser (mine is a 6-drawer chest) Six oak bed legs (I think five would have been enough, but while I was there …) 6 mounting plates A piece of plywood the size of the bottom of the cabinet (I went to the hardware store next door, it cost me less than 5€) Screws White adhesive edging tape How to raise the MALM dresser above a tall baseboard Place the MALM upside down. Fix the plywood onto the underside of the MALM with screws. Predrill holes for the leg screws (if you have the same baseboard problem as me, make sure you measur...

How to Document the Home Building Process

Building your home is a unique experience filled with stories you will never forget. There is also important information you need to remember if you build, even after you settle in. Whether it’s for your family or for future renovations, documenting your build is an important part of the process. Keeping track of your documents and making sure your family stay in the loop can help you stay organized and make sure you remember everything about your build. Not sure how to stay on top of all of the details? Document the process with these simple tips so you can always look back on it fondly. Collect this idea Use social media and involve your friends. Image: Kroiss Development Keep friends and family in the loop The home building process is exciting and your friends and family will want to be included. In fact, you’ll probably find that your new home becomes a popular conversation topic. You don’t need to personally keep everyone in the loop. Instead, you can find ways to keep ev...

Brighten up: A reading lamp the book lover will love

We already had a MAGNARP table lamp in the living room, but we were missing a reading lamp next to our couch. For a standing MAGNARP floor lamp, we didn’t have space. And the available other IKEA lamps were not for our taste. I already saw solutions with FRÄCK , so I decided to make my own wall mounted reading light, fused with MAGNARP. Here goes: IKEA items used: Steps for an IKEA wall mounted reading light: 1. Take apart both sets. 2. Cut the power line of the MAGNARP to be able to pull it out from the pipe. (Cut at both ends of the switch) 3. Cut the pipe. Besides the threaded part which goes inside the bulb socket you I will need approximate 5mm. 4. Cut M10 thread on the pipe’s end, and drill over the thread inside the main plate with M10 as well. 5. Bend the mirror’s fork as seen on the picture. 6. Mark the holes from the bent fork onto the main plate, and drill holes. 7. Make the electric work with a new switch. (I laced it inside the arm before doing so...