
Crib bunk bed hacked from IKEA GULLIVER cots

We have 4 kids and live in a tiny house, we have 3 bedrooms but my 3 year old daughter’s room is only 6ft x 6ft and her baby sister will be moving in with her soon.

We thought of many ideas to fit 2 children in this tiny space but the only viable option was an IKEA hack….of course!

I had seen the Gulliver toddler bunk bed hack but we need a cot, so had to come up with another hack.

We already had one Gulliver crib which had been converted to a toddler bed. We bought another Gulliver crib and got to work.

IKEA GULLIVER crib

Photo: IKEA.com

  • IKEA item: Gulliver Cribs x 2
  • Tools used: Table saw, electric saw, impact drill
  • Non Ikea Materials: Pine boards, screws and handrails for children’s play equipment.

1. We shortened the side of the top cot by cutting the cot bars and removed the leftover bars from the bottom rung and reattached it. We set the base of the bed at the newborn height and reattached the altered side. This gave the top cot bed a higher side for safety as well as giving us extra head room to get baby in and out below (700mm). We also cut a section at the end of the top cot to allow access in and out of the bed.

DIY a crib bunk bed

2. We added extended legs in between the top and bottom cots and on the outside we attached 700×350 pine legs (1.9meters high) this gave it extra stability and strength.

Extending the legs

3. Another bit of pine was run along the side of the top cot under the base and rail to ensure the base was strong. And another along the end under the exit point.

A platform for the ladder

4. We built a platform (from yellow tongue) with 2 steps allowing a step down of 250mm from the top cot to the top platform and 200mm from the top platform to the bottom. We also made 3 shelves under this for toy storage.

5. We then made a ladder out of 700x250mm pine for the sides and the leftover leg extender wood (140mmX19mm). This is only 350mm wide.

A ladder for the GULLIVER crib bunk bed

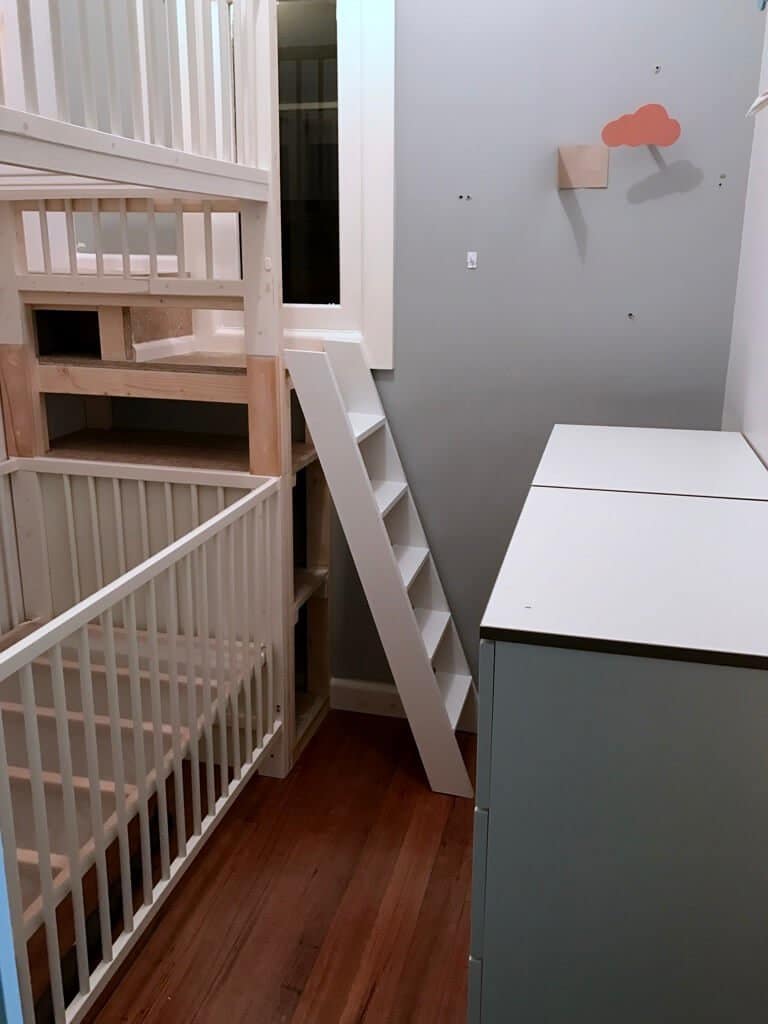
After some paint we moved 2 TRYSIL drawers in … love IKEA!

Ladder can be stowed when not in use

We drilled holes in the bottom platform and attached brackets to the ladder so it can be anchored there. During the day we will move it up on the platform so the kids can’t get up there except to sleep.

Crib bunk bed hacked from IKEA GULLIVER cots

Ladder with rails

Crib bunk bed hacked from IKEA GULLIVER cots

Exit point

We then painted it all white added some children’s safety handles to the ladder and some sensor LED lights for when she gets up in the night.

Crib bunk bed hacked from IKEA GULLIVER cots

Big girl up top

Crib bunk bed hacked from IKEA GULLIVER cots

Cot below

It may have been my idea but major credit goes to my lovely dad, Peter for actually implementing it. We had to build it in the room as the cots don’t fit through the doorway but we got there in the end!

~ by Courtney, Melbourne, Victoria, Australia


For more DIY bunk bed ideas, take a look at these:

- This one is hacked from MALM beds.
- The KRITTER children’s bed can be hacked into a bunk bed too.
- And of course, the ever popular KURA loft bed conversion.


Comments

Popular posts from this blog

Mind the gap: Fit IKEA MALM over a tall baseboard

I forgot one thing when I ordered the MALM dresser : The baseboards in my apartment are very tall and very wide. So, when I installed it, I had a 4 cm gap between the wall and the back of the cabinet which was not aesthetically possible for me. As it is not possible to cut the back of dresser at the bottom to leave room for the tall baseboard, I decided that MALM should be raised. And it was much simpler than I had imagined. You’ll need: A MALM dresser (mine is a 6-drawer chest) Six oak bed legs (I think five would have been enough, but while I was there …) 6 mounting plates A piece of plywood the size of the bottom of the cabinet (I went to the hardware store next door, it cost me less than 5€) Screws White adhesive edging tape How to raise the MALM dresser above a tall baseboard Place the MALM upside down. Fix the plywood onto the underside of the MALM with screws. Predrill holes for the leg screws (if you have the same baseboard problem as me, make sure you measur...

How to Document the Home Building Process

Building your home is a unique experience filled with stories you will never forget. There is also important information you need to remember if you build, even after you settle in. Whether it’s for your family or for future renovations, documenting your build is an important part of the process. Keeping track of your documents and making sure your family stay in the loop can help you stay organized and make sure you remember everything about your build. Not sure how to stay on top of all of the details? Document the process with these simple tips so you can always look back on it fondly. Collect this idea Use social media and involve your friends. Image: Kroiss Development Keep friends and family in the loop The home building process is exciting and your friends and family will want to be included. In fact, you’ll probably find that your new home becomes a popular conversation topic. You don’t need to personally keep everyone in the loop. Instead, you can find ways to keep ev...

Brighten up: A reading lamp the book lover will love

We already had a MAGNARP table lamp in the living room, but we were missing a reading lamp next to our couch. For a standing MAGNARP floor lamp, we didn’t have space. And the available other IKEA lamps were not for our taste. I already saw solutions with FRÄCK , so I decided to make my own wall mounted reading light, fused with MAGNARP. Here goes: IKEA items used: Steps for an IKEA wall mounted reading light: 1. Take apart both sets. 2. Cut the power line of the MAGNARP to be able to pull it out from the pipe. (Cut at both ends of the switch) 3. Cut the pipe. Besides the threaded part which goes inside the bulb socket you I will need approximate 5mm. 4. Cut M10 thread on the pipe’s end, and drill over the thread inside the main plate with M10 as well. 5. Bend the mirror’s fork as seen on the picture. 6. Mark the holes from the bent fork onto the main plate, and drill holes. 7. Make the electric work with a new switch. (I laced it inside the arm before doing so...