
Cross stitch table lamp: IKEA LAMPAN upgrade

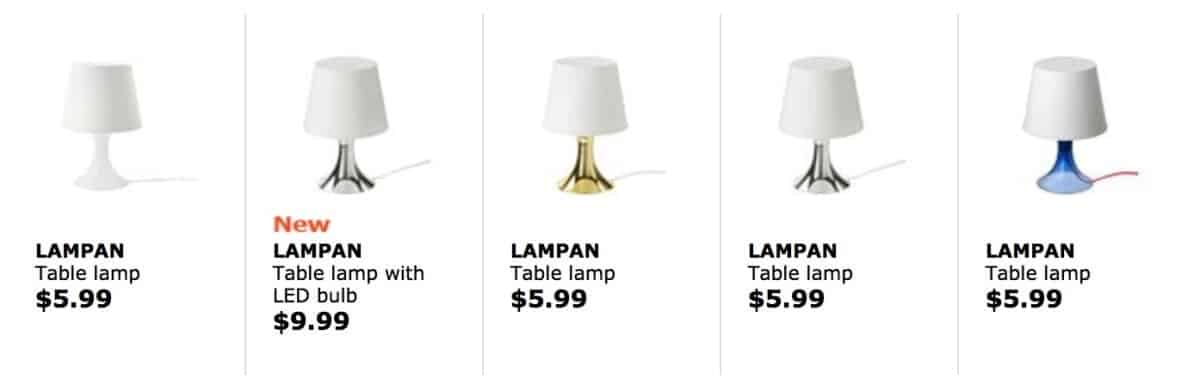
The LAMPAN lamp is a classic and one of the cheapest table lamp at IKEA. Coming in at a mere $5.99. It recently got a long overdue update — with new colours (gold, silver and blue) and a LED version ($9.99).

IKEA Lampan becomes cross stitch table lamp

If it’s still a little plain for you, it’s easy to embellish. Anat of Anenet Studio used cross stitch and added a pretty flower motif to an otherwise bland lamp shade. Here’s how she did it:

***

Materials:

Tools:

1. I copied the embroidery pattern on a piece of paper.

Attach the cross stitch pattern onto the lamp

Cross stitch table lamp IKEA lampan hack

2. I attached the pattern to the lamp using cellophane tape.

3. I drilled holes at the four corners of every X of the embroidery pattern. I used a 1.5 mm. drill bit.

Drill the holes for the cross stitch

Cross stitch table lamp IKEA lampan hack

4. I gave it a gentle sanding (used my Dremel, but you can do it by hand) to gently scrub off the left over bits from drilling. It sanded it both from the out side and from inside the lampshade.

Cross stitch table lamp IKEA lampan hack

5. I added the embroidery using regular embroidery floss and a needle.

Cross stitch table lamp IKEA lampan hack

Cross stitch table lamp IKEA lampan hack

Turn on the light and enjoy your work!

~ by Anat

View more projects by Anat on Anenet Studio.


Other ideas for the IKEA LAMPAN lamp

LAMPAN chandelier

Bet you didn’t know that this lowly table lamp can be turned into a chic chandelier. You’ll need at least 6 LAMPAN lamps to make one. See the instructions.

mushroom lamp for kids

This little switcheroo is perfect for the nursery. And best of all: you can do it together with your little ones. A cute mushroom lamp that is very easy and fun to make. Read more.

LAMPAN shade drilled

Another idea is just to drill a motif onto the shade itself. No embroidery required. Read more.


Comments

Popular posts from this blog

Mind the gap: Fit IKEA MALM over a tall baseboard

I forgot one thing when I ordered the MALM dresser : The baseboards in my apartment are very tall and very wide. So, when I installed it, I had a 4 cm gap between the wall and the back of the cabinet which was not aesthetically possible for me. As it is not possible to cut the back of dresser at the bottom to leave room for the tall baseboard, I decided that MALM should be raised. And it was much simpler than I had imagined. You’ll need: A MALM dresser (mine is a 6-drawer chest) Six oak bed legs (I think five would have been enough, but while I was there …) 6 mounting plates A piece of plywood the size of the bottom of the cabinet (I went to the hardware store next door, it cost me less than 5€) Screws White adhesive edging tape How to raise the MALM dresser above a tall baseboard Place the MALM upside down. Fix the plywood onto the underside of the MALM with screws. Predrill holes for the leg screws (if you have the same baseboard problem as me, make sure you measur...

How to Document the Home Building Process

Building your home is a unique experience filled with stories you will never forget. There is also important information you need to remember if you build, even after you settle in. Whether it’s for your family or for future renovations, documenting your build is an important part of the process. Keeping track of your documents and making sure your family stay in the loop can help you stay organized and make sure you remember everything about your build. Not sure how to stay on top of all of the details? Document the process with these simple tips so you can always look back on it fondly. Collect this idea Use social media and involve your friends. Image: Kroiss Development Keep friends and family in the loop The home building process is exciting and your friends and family will want to be included. In fact, you’ll probably find that your new home becomes a popular conversation topic. You don’t need to personally keep everyone in the loop. Instead, you can find ways to keep ev...

Brighten up: A reading lamp the book lover will love

We already had a MAGNARP table lamp in the living room, but we were missing a reading lamp next to our couch. For a standing MAGNARP floor lamp, we didn’t have space. And the available other IKEA lamps were not for our taste. I already saw solutions with FRÄCK , so I decided to make my own wall mounted reading light, fused with MAGNARP. Here goes: IKEA items used: Steps for an IKEA wall mounted reading light: 1. Take apart both sets. 2. Cut the power line of the MAGNARP to be able to pull it out from the pipe. (Cut at both ends of the switch) 3. Cut the pipe. Besides the threaded part which goes inside the bulb socket you I will need approximate 5mm. 4. Cut M10 thread on the pipe’s end, and drill over the thread inside the main plate with M10 as well. 5. Bend the mirror’s fork as seen on the picture. 6. Mark the holes from the bent fork onto the main plate, and drill holes. 7. Make the electric work with a new switch. (I laced it inside the arm before doing so...