
Hackers Help: How to shorten PAX wardrobes?

I moved into a new house with a huge open closet room with no storage. I designed my entire walk-in gorgeous closet using the PAX system, but now have realized my ceiling is too low. The ceiling is 78 1/4” tall.

Can the PAX system be cut down? Would you cut the bottom or the top?
I’ve searched the site and not found an alternative product.

~ by Ally

***

Hi Ally

The shorter PAX stands at 79 1/4″, just an inch taller than your ceiling. Oh bummer. Good news is … yes, you can shorten PAX wardrobes.

Dave cut down the PAX to create a bespoke loft wardrobe.

undereaves wardrobe

Here’s another one. The PAX cut into a craft and sewing cabinet to fit an awkward space.

How to shorten PAX wardrobes?

Now that its “cut-ability” is established, you need to know that the PAX is particleboard, so getting a good clean cut can be tricky. There are lots of good information on how to cut particleboard on the internet, like this one here, so I’ll not go into the how’s.

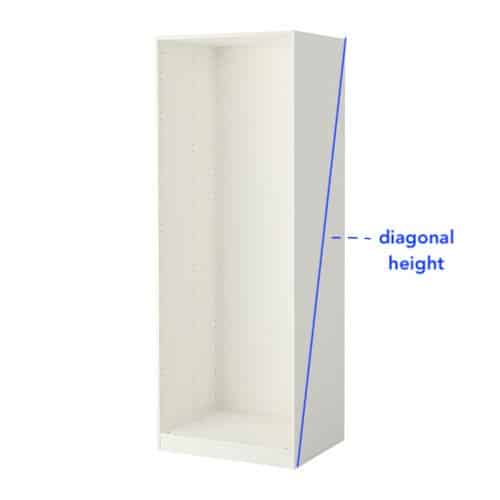
One thing to remember, you’ll need enough room height to accommodate the diagonal dimension of the wardrobe and not merely the height (79 1/4″), otherwise after you assemble it flat on the floor, you won’t have enough clearance to stand it up!

How to shorten PAX wardrobes?

As for cutting the top or bottom, because you’ll need to cut more than an inch off the PAX, cutting the bottom just won’t work. If you are using the doors, you would need to cut the doors too to fit the new frame size.

One last tip, cover up cut edges with iron on edge banding.

If all that seems too much to handle, you can use the ELVARI system to create an open wardrobe too. It looks a lot more polished than the cheaper ALGOT (which has its own problems).  

ELVARI system

Let us know how it goes.

Jules

Comments

Popular posts from this blog

Mind the gap: Fit IKEA MALM over a tall baseboard

I forgot one thing when I ordered the MALM dresser : The baseboards in my apartment are very tall and very wide. So, when I installed it, I had a 4 cm gap between the wall and the back of the cabinet which was not aesthetically possible for me. As it is not possible to cut the back of dresser at the bottom to leave room for the tall baseboard, I decided that MALM should be raised. And it was much simpler than I had imagined. You’ll need: A MALM dresser (mine is a 6-drawer chest) Six oak bed legs (I think five would have been enough, but while I was there …) 6 mounting plates A piece of plywood the size of the bottom of the cabinet (I went to the hardware store next door, it cost me less than 5€) Screws White adhesive edging tape How to raise the MALM dresser above a tall baseboard Place the MALM upside down. Fix the plywood onto the underside of the MALM with screws. Predrill holes for the leg screws (if you have the same baseboard problem as me, make sure you measur...

How to Document the Home Building Process

Building your home is a unique experience filled with stories you will never forget. There is also important information you need to remember if you build, even after you settle in. Whether it’s for your family or for future renovations, documenting your build is an important part of the process. Keeping track of your documents and making sure your family stay in the loop can help you stay organized and make sure you remember everything about your build. Not sure how to stay on top of all of the details? Document the process with these simple tips so you can always look back on it fondly. Collect this idea Use social media and involve your friends. Image: Kroiss Development Keep friends and family in the loop The home building process is exciting and your friends and family will want to be included. In fact, you’ll probably find that your new home becomes a popular conversation topic. You don’t need to personally keep everyone in the loop. Instead, you can find ways to keep ev...

Brighten up: A reading lamp the book lover will love

We already had a MAGNARP table lamp in the living room, but we were missing a reading lamp next to our couch. For a standing MAGNARP floor lamp, we didn’t have space. And the available other IKEA lamps were not for our taste. I already saw solutions with FRÄCK , so I decided to make my own wall mounted reading light, fused with MAGNARP. Here goes: IKEA items used: Steps for an IKEA wall mounted reading light: 1. Take apart both sets. 2. Cut the power line of the MAGNARP to be able to pull it out from the pipe. (Cut at both ends of the switch) 3. Cut the pipe. Besides the threaded part which goes inside the bulb socket you I will need approximate 5mm. 4. Cut M10 thread on the pipe’s end, and drill over the thread inside the main plate with M10 as well. 5. Bend the mirror’s fork as seen on the picture. 6. Mark the holes from the bent fork onto the main plate, and drill holes. 7. Make the electric work with a new switch. (I laced it inside the arm before doing so...