
Kids art display box: 10 min hack to store & show your kids art

I love my kids art and paintings. I love to keep the good ones and show them. This kids art display box allows me to save the paintings, show them, easily change the piece on display and, in general, give them the right attention.

The idea of the kids art display box itself is not mine. I already had two boxes like this made of wood I bought for my elder daughters many years ago. So, I wanted to add two more boxes but could not find it anywhere.

Since I was looking for these boxes for a long time, it was so fun to find out how easy and cheap it was to make them myself.

The box keeps the paintings (A4 gets in easily) and the first painting stands nicely in the frame thanks to the backer board.

The project itself takes about 10min.

It costs $11.5 ($8.99 + $2.49)

IKEA items used:

  • Hejsan Box set of 3 (using only the big box)
  • Fiskbo Frame 8.5×11′
IKEA HEJSAN box

HEJSAN | Photo: IKEA.com

FISKBO frame

FISKBO | Photo: IKEA.com

Other materials and tools:

Here’s how to make a kids art display box:

First, take the big box from the Hejsan pack of 3 boxes. Set the other 2 boxes aside for other projects. Then, cut about 1/3 from the top of the yellow cover. (I used knife for that).

Kids art display box: 10 min hack to store & show your kids art

Next, you’ll need to cut the slot. On the long side of the box (without the yellow covering), mark where you want to cut. I used the existing square grids on the box as a guide, leaving 2 squares on the long side and a little more then one square from the sides.

Kids art display box: 10 min hack to store & show your kids art

From the discarded rectangle, cut 4 little squares (1.5×1″) and glue them with hot glue on two places at the top of the back of the box. I measured about 2″ from each side. I used two layers of cardboard on each spot. This is needed to reinforce the spot where you will hang the box. (If you choose to mount the box differently you can skip this step.) On these spots, drill a large hole and right above it, a small hole, to form an inverted keyhole. The larger hole will allow the screw head to pass through and the smaller hole to lock the screw into position.

Next step is to glue the yellow cover to the sides of the box with hot glue.

Kids art display box: 10 min hack to store & show your kids art

Take off the Fiskbo black backer board and leave only the frame and the clear plastic. (Make sure to remove the protective sticker from both sides of the clear plastic.)

Kids art display box: 10 min hack to store & show your kids art

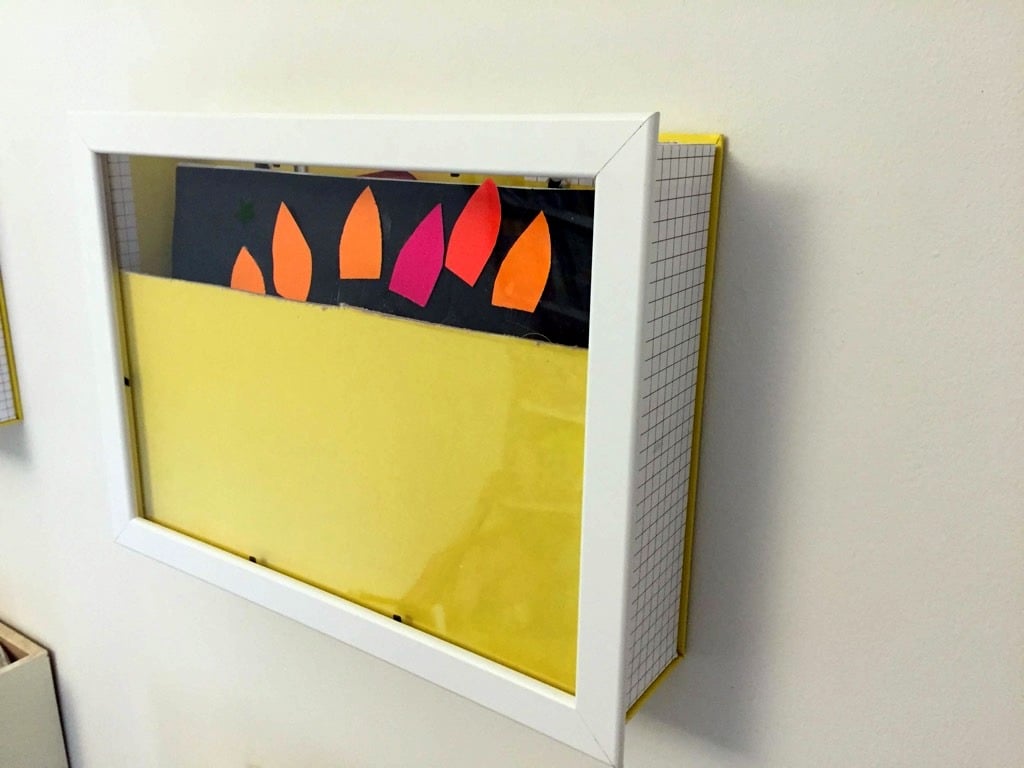
Finally, glue the Fiskbo frame to the yellow cover on three sides, leaving the top portion open to slot in a painting.

And your kids art display box is done.

The final step is to drill two screws to the wall to fit the holes you already created.

Kids art display box: 10 min hack to store & show your kids artKids art display box: 10 min hack to store & show your kids art

Notes on mounting

The hanging can be done with many other ways. I found it comfortable to drill two screws to the wall in a way I can take off the box and put it back. This is definitely not a must. It can be screwed straight to the wall or glued to it.

~ by Merav Ziv-Ari

Comments

Popular posts from this blog

Mind the gap: Fit IKEA MALM over a tall baseboard

I forgot one thing when I ordered the MALM dresser : The baseboards in my apartment are very tall and very wide. So, when I installed it, I had a 4 cm gap between the wall and the back of the cabinet which was not aesthetically possible for me. As it is not possible to cut the back of dresser at the bottom to leave room for the tall baseboard, I decided that MALM should be raised. And it was much simpler than I had imagined. You’ll need: A MALM dresser (mine is a 6-drawer chest) Six oak bed legs (I think five would have been enough, but while I was there …) 6 mounting plates A piece of plywood the size of the bottom of the cabinet (I went to the hardware store next door, it cost me less than 5€) Screws White adhesive edging tape How to raise the MALM dresser above a tall baseboard Place the MALM upside down. Fix the plywood onto the underside of the MALM with screws. Predrill holes for the leg screws (if you have the same baseboard problem as me, make sure you measur...

How to Document the Home Building Process

Building your home is a unique experience filled with stories you will never forget. There is also important information you need to remember if you build, even after you settle in. Whether it’s for your family or for future renovations, documenting your build is an important part of the process. Keeping track of your documents and making sure your family stay in the loop can help you stay organized and make sure you remember everything about your build. Not sure how to stay on top of all of the details? Document the process with these simple tips so you can always look back on it fondly. Collect this idea Use social media and involve your friends. Image: Kroiss Development Keep friends and family in the loop The home building process is exciting and your friends and family will want to be included. In fact, you’ll probably find that your new home becomes a popular conversation topic. You don’t need to personally keep everyone in the loop. Instead, you can find ways to keep ev...

Brighten up: A reading lamp the book lover will love

We already had a MAGNARP table lamp in the living room, but we were missing a reading lamp next to our couch. For a standing MAGNARP floor lamp, we didn’t have space. And the available other IKEA lamps were not for our taste. I already saw solutions with FRÄCK , so I decided to make my own wall mounted reading light, fused with MAGNARP. Here goes: IKEA items used: Steps for an IKEA wall mounted reading light: 1. Take apart both sets. 2. Cut the power line of the MAGNARP to be able to pull it out from the pipe. (Cut at both ends of the switch) 3. Cut the pipe. Besides the threaded part which goes inside the bulb socket you I will need approximate 5mm. 4. Cut M10 thread on the pipe’s end, and drill over the thread inside the main plate with M10 as well. 5. Bend the mirror’s fork as seen on the picture. 6. Mark the holes from the bent fork onto the main plate, and drill holes. 7. Make the electric work with a new switch. (I laced it inside the arm before doing so...