
Ideas for kitchen paper towel holder

A table top kitchen paper towel holder is a bit of an annoyance, if you ask me. I prefer to keep paper towels off the countertop. And I like a holder that lets me easily reach, pull and tear off paper when needed (usually in the middle of a hot mess!) Here are a few ideas for hanging paper towel holders.

1. FINTORP + Carabiner

This is Anders’ quick and easy fix for a paper towel holder. He used a FINTORP kitchen rail, string and a carabiner.

IKEA fintorp paper towel holder hack

Put a string in a loop with a carabiner in one end. Thread the string around the FINTORP bar and through the paper towel pipe. And that’s it. Release the string from the carabiner when you want to swap out an empty roll.

2. Another FINTORP paper towel holder

FINTORP paper towel holder with shortened rail
Photo: Lady Chaos

Lady Chaos made a classier version of the FINTORP paper towel holder.  She used two FINTORP rails: a longer one for the wall and a shortened one to fit the length of kitchen paper rolls.  On both sides of the longer rail she used FINTORP hooks to hang up the shorter rod. See full tutorial on Lady Chaos. Or similar here.

3. The stand or hang solution from IKEA

IKEA FINTORP paper towel holder stand

ikea-fintorp-paper-towel-holder
Photo: IKEA.com

The FINTORP paper towel holder from IKEA isn’t a bad idea, as it allows you to use it on the countertop or hang up the rail. My only gripe is you’ll probably need 2 hands to use it in hanging mode. One to keep the holder from swinging and another to tear the paper.

4. BEKVÄM spice and paper rack

BEKVÄM spice rack with paper holder

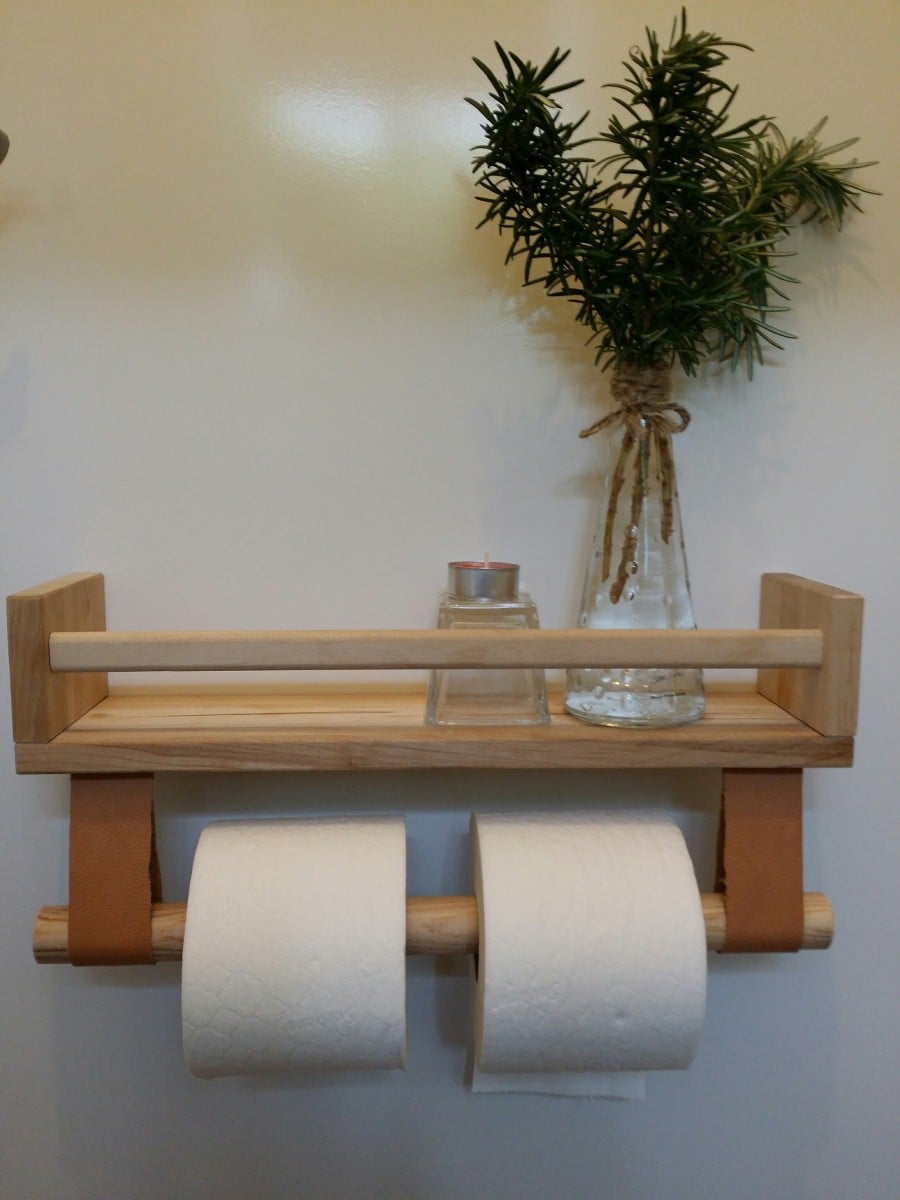
Moving away from the FINTORP range, you can also add a paper towel holder to the BEKVÄM spice rack. Just attach leather strips to the underside of the BEKVÄM and slot in a rod to hold up the kitchen towels. It’s perfect for the bathroom too, for toilet rolls and reading material. :)  Read more.

Comments

Popular posts from this blog

Mind the gap: Fit IKEA MALM over a tall baseboard

I forgot one thing when I ordered the MALM dresser : The baseboards in my apartment are very tall and very wide. So, when I installed it, I had a 4 cm gap between the wall and the back of the cabinet which was not aesthetically possible for me. As it is not possible to cut the back of dresser at the bottom to leave room for the tall baseboard, I decided that MALM should be raised. And it was much simpler than I had imagined. You’ll need: A MALM dresser (mine is a 6-drawer chest) Six oak bed legs (I think five would have been enough, but while I was there …) 6 mounting plates A piece of plywood the size of the bottom of the cabinet (I went to the hardware store next door, it cost me less than 5€) Screws White adhesive edging tape How to raise the MALM dresser above a tall baseboard Place the MALM upside down. Fix the plywood onto the underside of the MALM with screws. Predrill holes for the leg screws (if you have the same baseboard problem as me, make sure you measur...

How to Document the Home Building Process

Building your home is a unique experience filled with stories you will never forget. There is also important information you need to remember if you build, even after you settle in. Whether it’s for your family or for future renovations, documenting your build is an important part of the process. Keeping track of your documents and making sure your family stay in the loop can help you stay organized and make sure you remember everything about your build. Not sure how to stay on top of all of the details? Document the process with these simple tips so you can always look back on it fondly. Collect this idea Use social media and involve your friends. Image: Kroiss Development Keep friends and family in the loop The home building process is exciting and your friends and family will want to be included. In fact, you’ll probably find that your new home becomes a popular conversation topic. You don’t need to personally keep everyone in the loop. Instead, you can find ways to keep ev...

Brighten up: A reading lamp the book lover will love

We already had a MAGNARP table lamp in the living room, but we were missing a reading lamp next to our couch. For a standing MAGNARP floor lamp, we didn’t have space. And the available other IKEA lamps were not for our taste. I already saw solutions with FRÄCK , so I decided to make my own wall mounted reading light, fused with MAGNARP. Here goes: IKEA items used: Steps for an IKEA wall mounted reading light: 1. Take apart both sets. 2. Cut the power line of the MAGNARP to be able to pull it out from the pipe. (Cut at both ends of the switch) 3. Cut the pipe. Besides the threaded part which goes inside the bulb socket you I will need approximate 5mm. 4. Cut M10 thread on the pipe’s end, and drill over the thread inside the main plate with M10 as well. 5. Bend the mirror’s fork as seen on the picture. 6. Mark the holes from the bent fork onto the main plate, and drill holes. 7. Make the electric work with a new switch. (I laced it inside the arm before doing so...