
5 Lighting A Bathroom Tips Perth

Lighting plays a big part in both the mood and efficiency of a bathroom, so if you’re planning a bathroom renovation, be sure to spend some time thinking about it. Below are the 5 Lighting tips we recommend too all our Perth clients during their renovations. Electrical can sometimes be one of the lowest costings options during the renovation but can often give the highest impact.


1. Raining Pendants
We’re more used to seeing pendant lights over kitchen islands and dining tables, but they can work wonders in a bathroom. In the right setting the pendant creates a feeling of height in a room and is perfect add on to the room as you can see in this bathroom renovation in Thornlie below.

Thornlie Bathroom Renovation 


Thornlie Bathrooms 

2. Grout Them Together
Small downlights can also look striking grouped together and are a great way to add a sculptural touch to your bathroom. These small orbs add atmosphere to the bathing zone and help the small bathroom feel large. This bathroom in southern river was modern but needed to add light in the corners

Southern River Bathroom Renovations


Southern River Bathrooms

3. Spotlighting the Downlight
LED downlights are the best thing for bathroom renovation since the invention of grout sealer. The downlight can really allow you to focus on one feature such as a vanity bowl to really add a wow factor. The photos below are from a renovation in Como, Western Australia. Denise wanted to really have her vanity top pop and a downlight above was perfect.
Como Bathroom Renovations

Bathrooms Como 

Como Bathrooms

Bathroom Renovation Como 

4. Opt for concealed lighting
Its like magic one client described. Exactly as it sounds concealed lighting is the perfect way to add atmosphere to a bathroom. It offers the chance to get much more creative with your lighting and give your room real wow factor. The bathroom below in Perth used strip lighting under the vanity to set the right mood controlled on a remote. We also put up a fun video if you wanted to check it out.
Thornlie Bathroom Renovation

On the Ball Bathrooms 

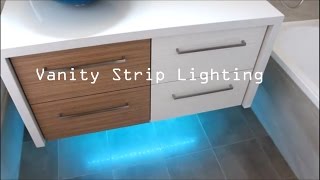
Bathroom Lighting Perth 

5. Highlight a Shower Box
If the box wasn’t a wow enough now you can add a little extra wow. Try illuminating an inset shelf to transform it from something utilitarian into an attractive feature. You can either go the full length like this bathroom in Success or the bathroom renovation below that in bibra lake where you install a singular downlight
Bathroom Renovations Success

Lighting Bathrooms Perth 

Like I always say planning is the key part to any of this. Take into consideration how much natural light you have and work from there. The more like the better I have always thought but try not to make it feel tacky with too much-colored lighting.

At on the ball bathrooms let me know what you think comment below or if you are looking for a quote and live in Perth, Western Australia contact us on 0419964678 or email us at ontheballbathrooms@gmail.com

For More DIY Tips For Renovating Your Bathroom Visit:
Website: https://ontheballbathrooms.com.au
Like us on Facebook: http://facebook.com/ontheballbathrooms
High-resolution examples of all projects: https://www.houzz.com.au/pro/ontheball
Keep up with us on Instagram: www.instagram.com/ontheballbathrooms

Advertisements

Comments

Popular posts from this blog

Mind the gap: Fit IKEA MALM over a tall baseboard

I forgot one thing when I ordered the MALM dresser : The baseboards in my apartment are very tall and very wide. So, when I installed it, I had a 4 cm gap between the wall and the back of the cabinet which was not aesthetically possible for me. As it is not possible to cut the back of dresser at the bottom to leave room for the tall baseboard, I decided that MALM should be raised. And it was much simpler than I had imagined. You’ll need: A MALM dresser (mine is a 6-drawer chest) Six oak bed legs (I think five would have been enough, but while I was there …) 6 mounting plates A piece of plywood the size of the bottom of the cabinet (I went to the hardware store next door, it cost me less than 5€) Screws White adhesive edging tape How to raise the MALM dresser above a tall baseboard Place the MALM upside down. Fix the plywood onto the underside of the MALM with screws. Predrill holes for the leg screws (if you have the same baseboard problem as me, make sure you measur...

How to Document the Home Building Process

Building your home is a unique experience filled with stories you will never forget. There is also important information you need to remember if you build, even after you settle in. Whether it’s for your family or for future renovations, documenting your build is an important part of the process. Keeping track of your documents and making sure your family stay in the loop can help you stay organized and make sure you remember everything about your build. Not sure how to stay on top of all of the details? Document the process with these simple tips so you can always look back on it fondly. Collect this idea Use social media and involve your friends. Image: Kroiss Development Keep friends and family in the loop The home building process is exciting and your friends and family will want to be included. In fact, you’ll probably find that your new home becomes a popular conversation topic. You don’t need to personally keep everyone in the loop. Instead, you can find ways to keep ev...

Brighten up: A reading lamp the book lover will love

We already had a MAGNARP table lamp in the living room, but we were missing a reading lamp next to our couch. For a standing MAGNARP floor lamp, we didn’t have space. And the available other IKEA lamps were not for our taste. I already saw solutions with FRÄCK , so I decided to make my own wall mounted reading light, fused with MAGNARP. Here goes: IKEA items used: Steps for an IKEA wall mounted reading light: 1. Take apart both sets. 2. Cut the power line of the MAGNARP to be able to pull it out from the pipe. (Cut at both ends of the switch) 3. Cut the pipe. Besides the threaded part which goes inside the bulb socket you I will need approximate 5mm. 4. Cut M10 thread on the pipe’s end, and drill over the thread inside the main plate with M10 as well. 5. Bend the mirror’s fork as seen on the picture. 6. Mark the holes from the bent fork onto the main plate, and drill holes. 7. Make the electric work with a new switch. (I laced it inside the arm before doing so...