
Pros and Cons Stone Bathroom Feature Wall

Stone cladding was a massive trend for about three years but hey I still love it. You don’t have to come from the Stone Age to appreciate the beauty and practicality of natural stone. We have laid this style of  the bathroom so many times with the suburb of Southern River, Western Australia being the hot spot for us during that time. It was often blended with being used externally and internally as feature walls with that country feel becoming urbanized in these modern settings. For a bathroom feature wall where this style of stone tile is best used you can go from free form or dry stone wall for that rustic natural look without the weight or the high expense.


Pros

  1. Low costings for a feature wall compared to something such as mosaics

  2. Creates a natural feel regardless of how modern the fixtures

  3. NO GROUT

Cons

  1. Depending on the stone can be porous

  2. Often is jagged so not suitable for some shower or children

  3. Cutting can be difficult sometimes with the more natural the product the more unpredictable it can be

  4. As you can see in the bathroom renovation below in jandakot cleaning can be an issue

One design tip is if you can continue the stone wall onto the outside that’s visible through a window to help blur the lines between inside and out this will create the illusion of a larger space.

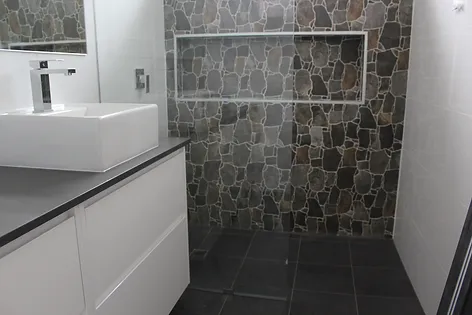
As you can see from the photos it feels special. It has a wow factor and a natural wow which is hard to do the look. It evokes feelings of a waterfall or an old English manor depending on the finish which can add depth to your bathroom renovation. Like all the advice I have done lately modern and older trends are all about what

feels good to you. If you don’t like it before you start you rarely will love it at the end so pick wisely and look at as much as you can.


For More DIY Tips For Renovating Your Bathroom Visit:
Website: https://ontheballbathrooms.com.au
Like us on Facebook: http://facebook.com/ontheballbathrooms
High-resolution examples of all projects: https://www.houzz.com.au/pro/ontheball
Keep up with us on Instagram: www.instagram.com/ontheballbathrooms

Advertisements

Comments

Popular posts from this blog

Mind the gap: Fit IKEA MALM over a tall baseboard

I forgot one thing when I ordered the MALM dresser : The baseboards in my apartment are very tall and very wide. So, when I installed it, I had a 4 cm gap between the wall and the back of the cabinet which was not aesthetically possible for me. As it is not possible to cut the back of dresser at the bottom to leave room for the tall baseboard, I decided that MALM should be raised. And it was much simpler than I had imagined. You’ll need: A MALM dresser (mine is a 6-drawer chest) Six oak bed legs (I think five would have been enough, but while I was there …) 6 mounting plates A piece of plywood the size of the bottom of the cabinet (I went to the hardware store next door, it cost me less than 5€) Screws White adhesive edging tape How to raise the MALM dresser above a tall baseboard Place the MALM upside down. Fix the plywood onto the underside of the MALM with screws. Predrill holes for the leg screws (if you have the same baseboard problem as me, make sure you measur...

How to Document the Home Building Process

Building your home is a unique experience filled with stories you will never forget. There is also important information you need to remember if you build, even after you settle in. Whether it’s for your family or for future renovations, documenting your build is an important part of the process. Keeping track of your documents and making sure your family stay in the loop can help you stay organized and make sure you remember everything about your build. Not sure how to stay on top of all of the details? Document the process with these simple tips so you can always look back on it fondly. Collect this idea Use social media and involve your friends. Image: Kroiss Development Keep friends and family in the loop The home building process is exciting and your friends and family will want to be included. In fact, you’ll probably find that your new home becomes a popular conversation topic. You don’t need to personally keep everyone in the loop. Instead, you can find ways to keep ev...

IKEA KALLAX Queen Storage Bed

I built this prior to knowing this website existed, this probably would have saved some contemplation. For difficulty reference, I am no carpenter (electrician actually) and I built it with my right hand in a cast. We bought an old house with original hardwood flooring from the 40s so we were very concerned about damaging it. The casters on a normal bed frame put a lot of pressure on a small surface and we didn’t want it dented or damaged if things started a rockin …. Plus, a 40′s house has virtually no storage as you only needed 3 pairs of pants back then. IKEA material : 3 x KALLAX shelf units (4) 4 x KALLAX drawer kits 8 x KALLAX fabric boxes Non-IKEA material : 4 x 2×4 A grade (saves time) 2 x 2×6 2 x sheets 1/2″ plywood (what ever grade you want) 25ft x iron-on edge trim 100 x 3″ #8 wood screws 20 x 1-1/4″ #8 wood screws satin white paint Tools (I used) : Tape measure Drill w/ 1/8″ bit for piloting holes Impact driver for screws Table saw Miter saw Ass...